


Build custom, structured Excel reports from monday.com board data and send them automatically to the right people on schedule.


How to manage client access and logins in a monday.com client portal
Decide when people should share a client view and when they need separate access. Manage new contacts, staff changes and the end of a client relationship without rebuilding your portal.

Table of contents
Use the navigation below to quickly jump to your desired section and learn more about each topic.
Client access rarely stays the way it was on the first day. A project lead needs to review work, somebody from finance asks for invoices, and a few months later one of those contacts leaves the company. Each change raises a practical question: should this person see the same information as their colleagues, or do they need a different view?
Creating a password is only one part of the answer. Your team also needs to decide which client record the person belongs to, which items they should see and what should happen when their access is no longer needed. If those decisions are unclear, adding more logins can make the setup harder to manage without providing the separation you expected.
With Client Portal Builder for monday.com, access is managed from the Clients Board alongside the relationship your team already maintains. This guide explains how to plan that access, handle changes in the people who use it and check the result before sending an invitation. The detailed login, password and automation steps are linked where you need them.
Client Portal Builder adds a dedicated client facing layer to the boards and workflows you already manage in monday.com. Give external contacts access to the information they need, while your team manages client records, board connections and login methods in monday.com.
Portal access
A portal login is different from a monday.com guest
Clients sign in to your portal rather than becoming users in your monday.com workspace. Their login methods do not take up monday.com seats, and the portal presents the pages, board items and actions you have configured for them.
Inviting somebody as a monday.com guest is a different choice: it gives them access within monday.com itself. A portal is useful when the person needs a focused client experience rather than a place in your internal workspace. For that comparison, see how to share monday.com boards with external users and guests.

Clients Board
Decide what one client item should represent
Before creating logins, decide which people should share the same access. A Clients Board item often represents a company, but it can also represent an individual or another unit whose members should see the same portal content.
Login methods belong to that item. The portal identifies the client through the login, then uses the client's board relationships and page or section conditions to determine what to show. Conceptually, the relationship looks like this:
Person signs in → login method identifies a client item → client relationships and conditions select the content → portal displays that client's view
Add and manage those login methods in the Client Settings item view. Giving two people different passwords does not, by itself, give them different data permissions.

Several login methods on the same client item share that client's portal view. Separate logins make it easier to manage each person's access, but they do not create project-lead and finance roles within that client item. Portal interactions run on behalf of the client; a person's login name can identify their comments when a name is available.
Access planning
Start with what each person should see
Imagine an agency works with Acme Corp. Acme's project lead reviews deliverables, while a finance contact checks invoices. Before creating either login, the agency needs to answer one question: are both contacts allowed to see the same projects, invoices and messages?
The answer determines the structure. Their job titles alone do not.
When finance should see invoices but not projects
A second login on Acme's existing client item will not create that restriction. Instead, use separate client items, such as Acme Projects and Acme Finance, and attach each person's login to the appropriate one.
Configure the data relationships for each item. For example, project items can connect only to Acme Projects, while invoices connect to both items if both contacts should see them. An Access profile Status column on the Clients Board can then control which pages and sections appear: the finance profile sees the Invoices page, while the project profile sees Projects and Invoices.
Separate client items → separate data relationships and conditions → different portal views
Page conditions and board sources solve different parts of the setup. Conditions determine whether a page or section is visible; the board source determines which items it contains. Set up both deliberately rather than relying on a person's login name or a hidden navigation entry to separate their data. The same principle applies when each person needs access only to their own tasks or approvals.
Check the result for each client item
A shared operational board can still provide different views. In the example below, Acme Corp sees its projects and Globex Industries sees a different set of projects on the same portal page. When you split access within a company, check the board connections and conditions with the same care.
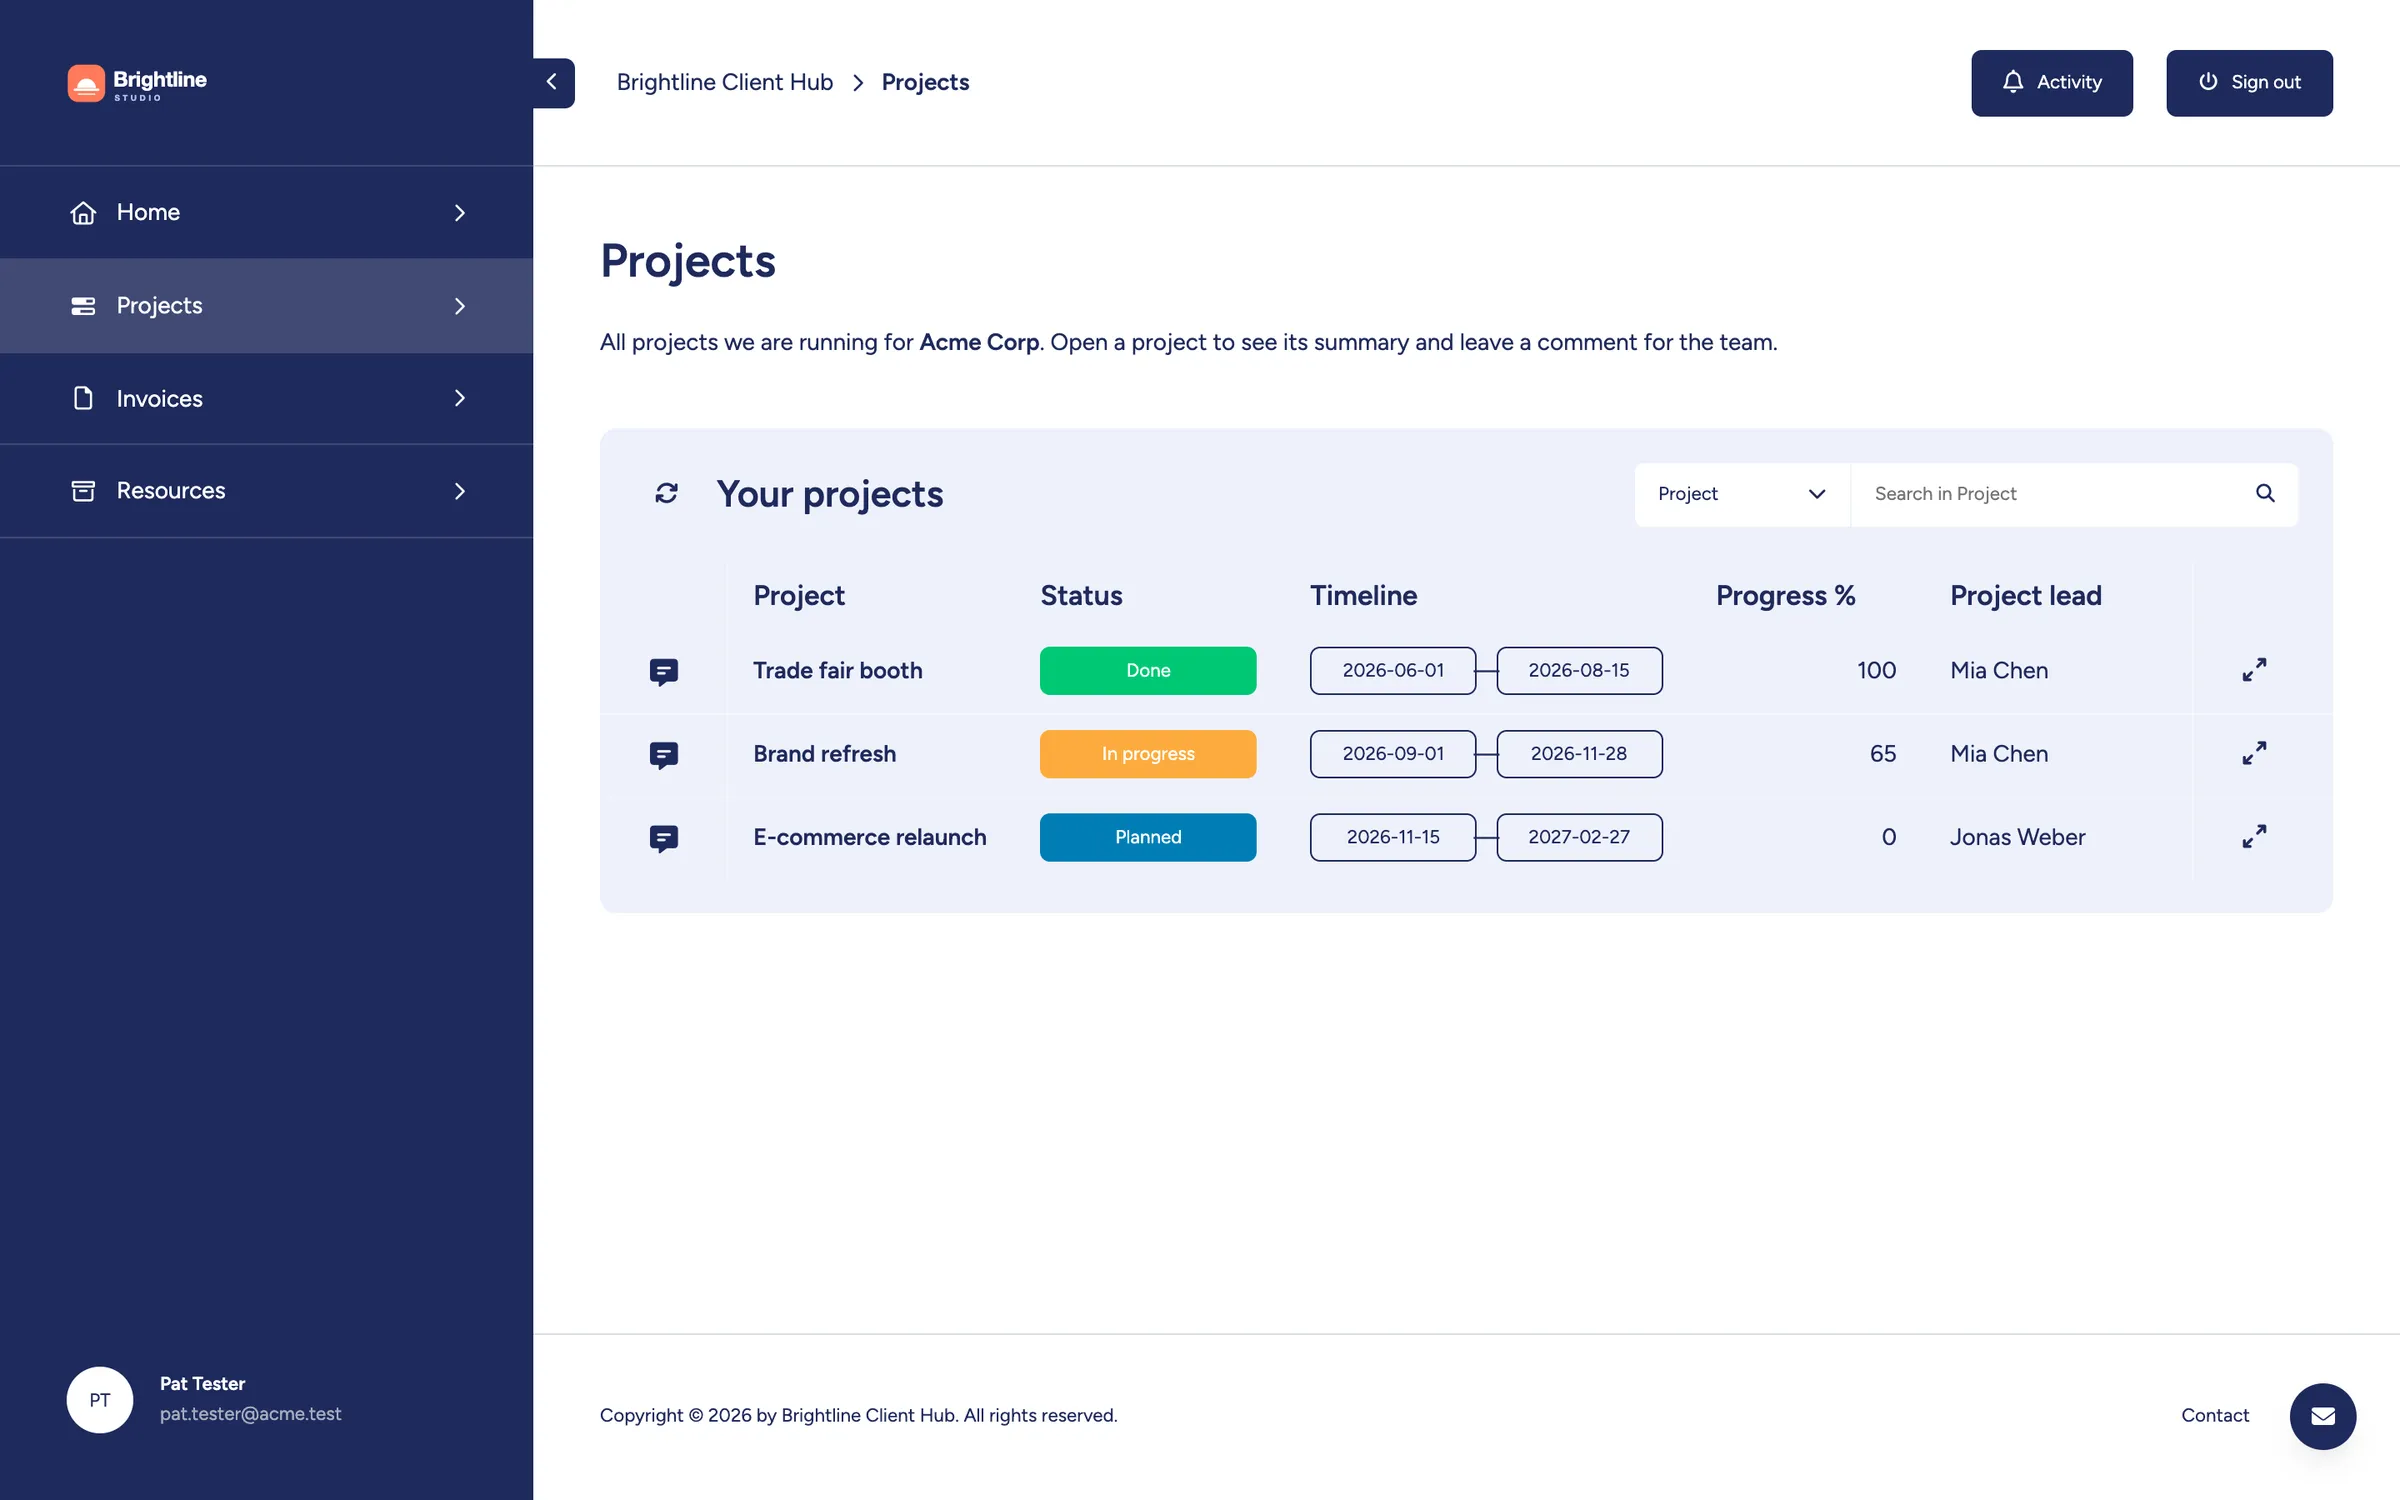
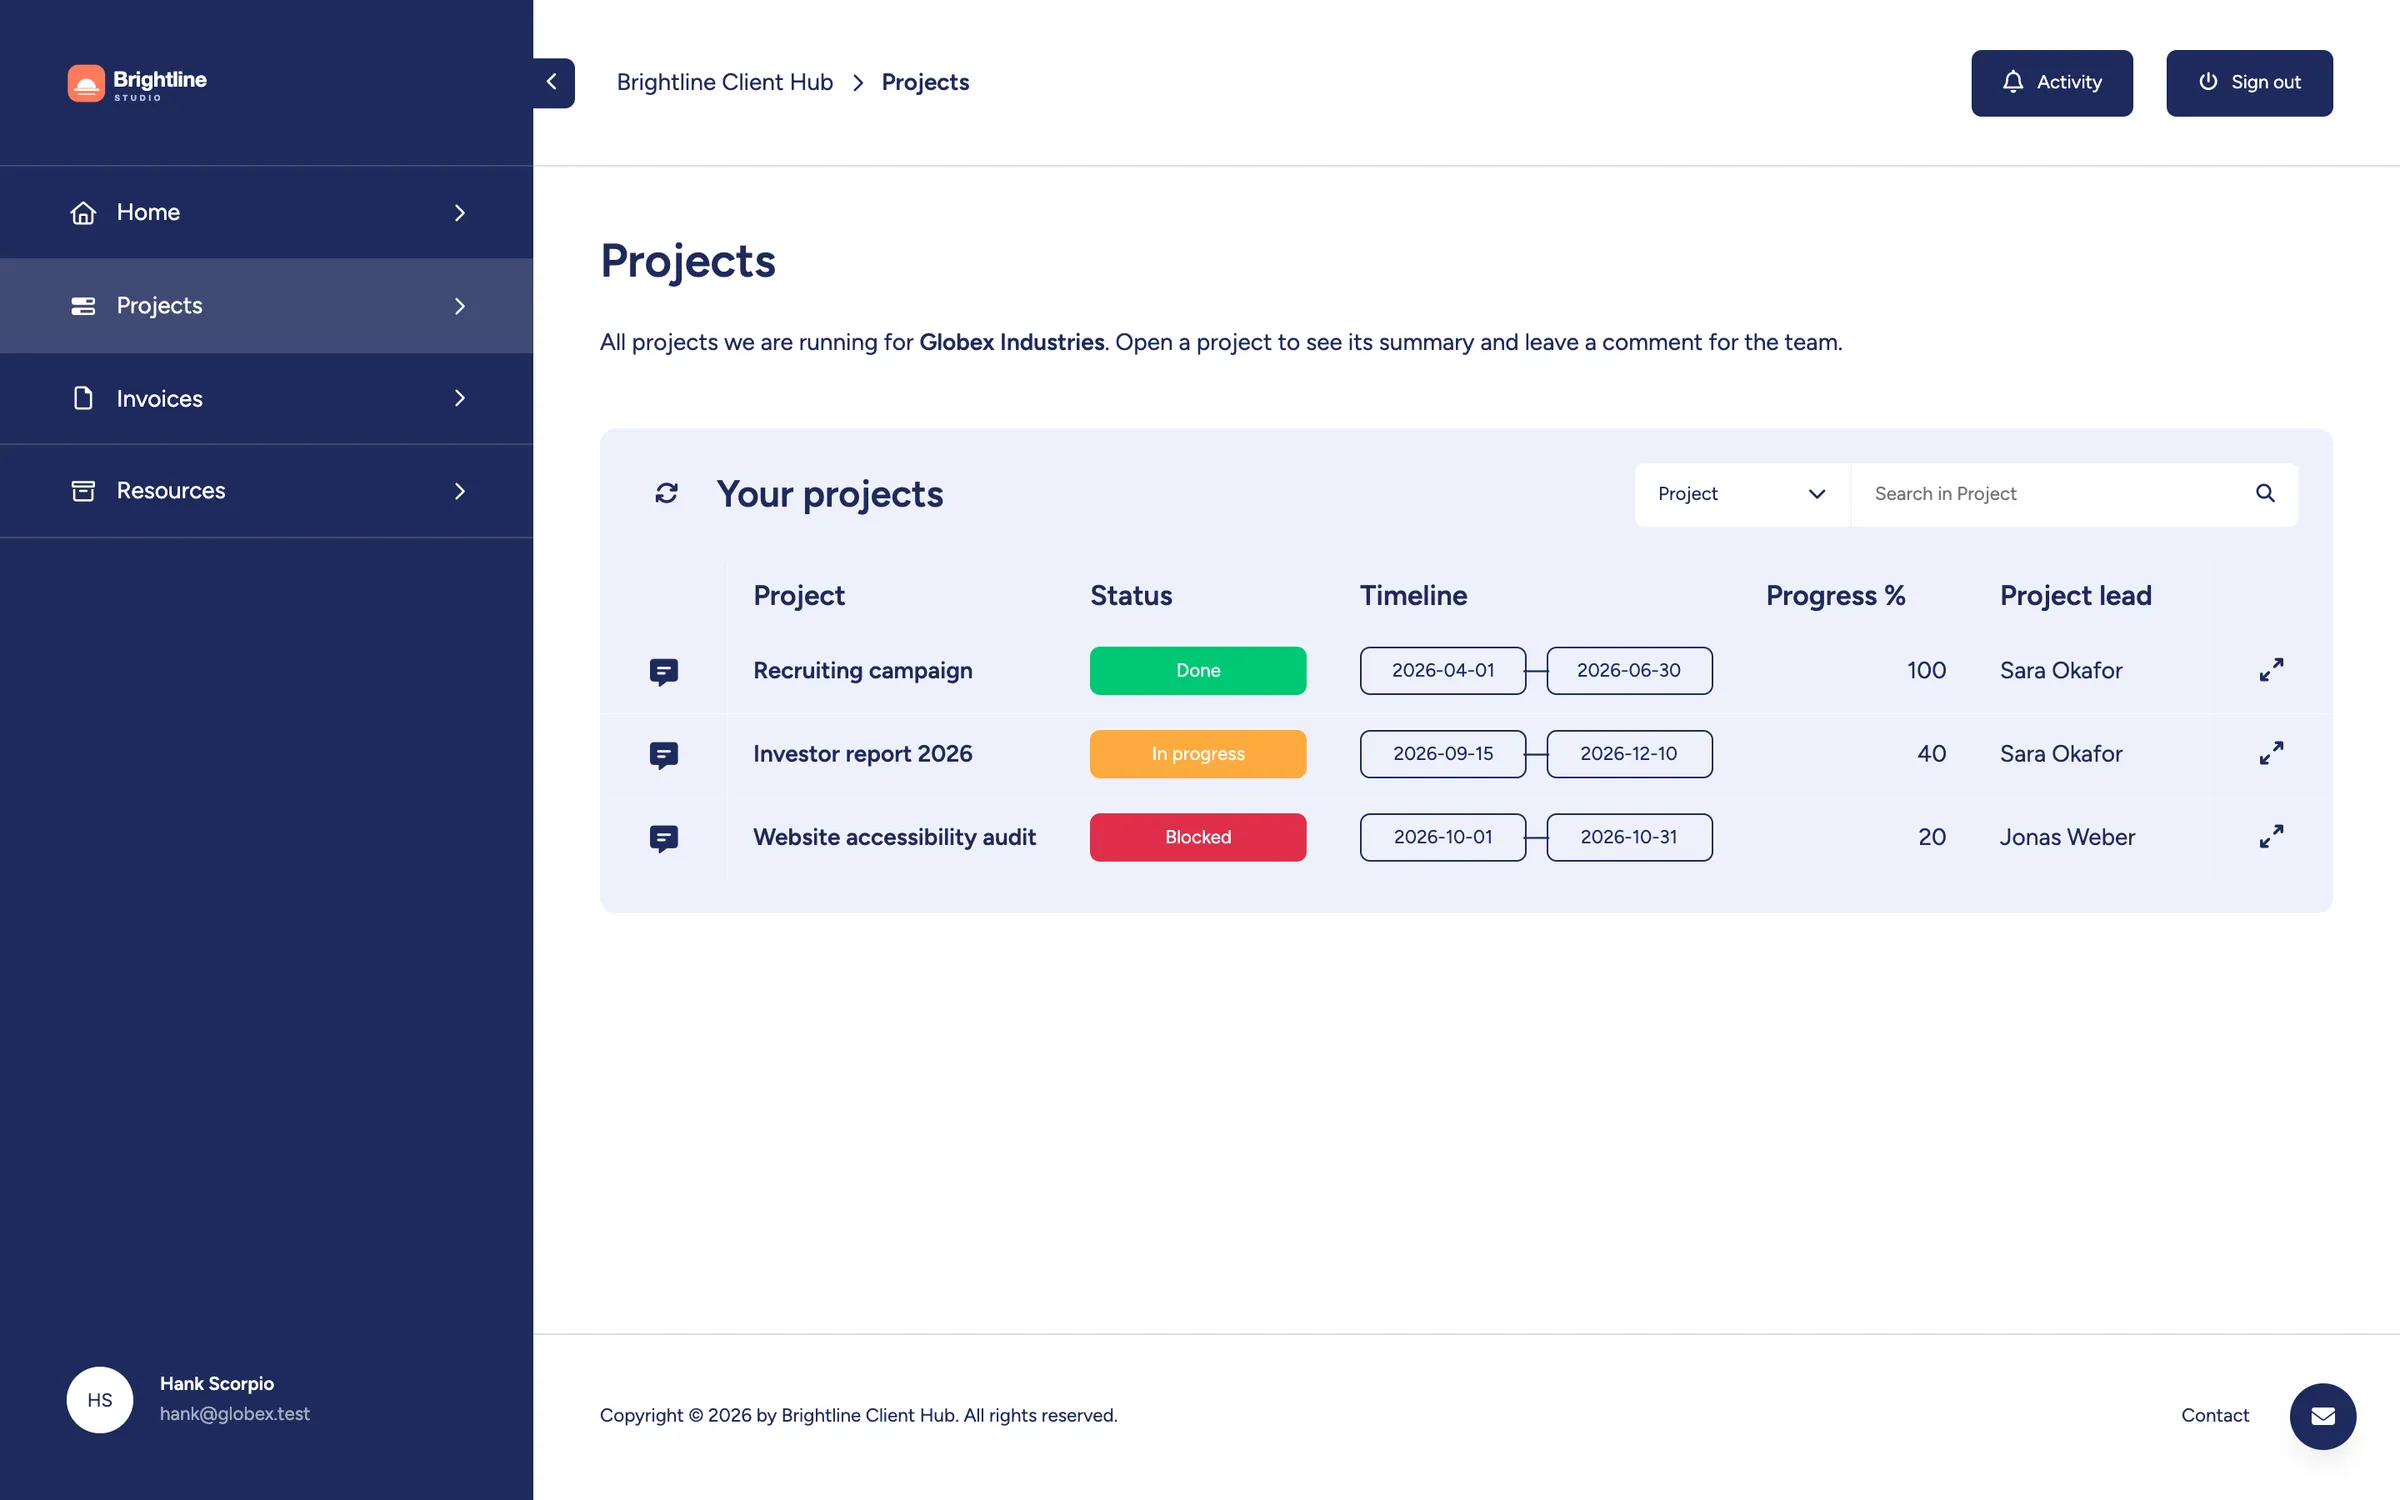
You can manage these client items within one portal. You do not need to build another portal for every person who needs different access. For more detail on board relationships, dedicated boards and conditions, see how to create personalized client views.
Login methods
Choose how each person signs in
Once the access structure is clear, choose the login method. Client Portal Builder supports Credentials and Google authentication, and you can use both across your clients. This choice changes how somebody signs in; it does not change the data permissions of the client item they belong to.

Credentials when your team manages the login
Credentials use an email address and password. They are useful when your contacts do not use Google or when you want to provide a login directly. Plan who sends the invitation, where the client gets help and how forgotten passwords are handled. Follow the client login setup guide for the creation steps.
Google when your contacts already use a Google account
Google authentication lets the contact sign in with their Google account rather than a separate portal password. It requires the portal's Google authentication configuration, a custom domain and a Google login method for the contact. Follow the Google authentication guide for setup and account requirements.
Login page
Make the login page explain itself
The login page is the first thing a new client sees, often straight from an invitation email. Use it to explain what they will find and where to get help if they cannot sign in.
Under Settings in the Client Portal Builder view, the Login Text setting adds a short text above the login form. It supports Markdown, so you can:
- welcome clients and explain what they will find in the portal
- link to a monday.com WorkForm where clients can request a password reset
- link to a registration form for new clients
- add a contact address for access questions
Link only to processes your team has set up. Adding a reset or registration link tells clients where to go; the form and any automation behind it still need to handle the request.

Password support
Make password help part of the access process
For credentials logins, decide who handles forgotten passwords and how clients find the right help. Your team can update a password manually, automate the reset or configure a WorkForm-based reset process. These options need to be set up; a login page alone does not create a self-service reset workflow.
If you enable Password Update, clients who are already signed in with credentials can change their own password in Account Settings. That is different from recovering access after forgetting the password. The password reset guide explains both cases and their setup.

Managing access
Use the right switch for the change you need
A contact leaving Acme is different from Acme ending its relationship with your business. The first change affects one person; the second may affect every person at that client. Client Settings provides controls for both:
- Disable a login method when one contact should no longer sign in, while their colleagues keep access.
- Disable the whole client with its
Enabledtoggle when everybody using that client item should lose access. - Delete a login method when you no longer need that method. Disabling is useful when access may be needed again later.
If you represented one company with several client items to provide different access, review each of those items when the company leaves. Disabling Acme Projects does not also disable Acme Finance.

Removing access does not require deleting the company's projects or rebuilding the portal. Keep the underlying client records and work where they belong, and change the relevant login or client controls. Use the login method's comment field to record which contact or role it belongs to so the next person on your team can understand the setup.
Example
Replace a departing contact without rebuilding access
Acme's project lead leaves and a replacement takes over. The finance contact still needs the same access as before. The goal is to change who can sign in without moving projects, recreating the client relationship or interrupting the finance contact.
Step 1: Identify the departing person's login
Open the appropriate Acme client item, find the departing person's login method and disable it. If both contacts share one client item, leave the client itself enabled so the finance contact keeps access. If they have separate client items, keep the existing project client item and its board connections for the replacement.
Step 2: Create a login for the replacement
Add a new login method on the client item that already has the required access. Use the replacement's details and the appropriate sign-in method. This keeps the company's project and invoice connections in place while giving your team a separate login to manage for the new person.
If the replacement should have different access, review the client item's data relationships and conditions first rather than assuming the new login can have its own permissions within that item.
Step 3: Check the view, then send the invitation
Before sending the invitation, use a test login configured for the same client item to check the expected projects, invoices and available actions. Confirm that content outside the replacement's intended access is not shown.
Once the view is correct, send the replacement the portal address and the sign-in instructions appropriate to their login method. Update the login comments and your internal contact records so the next access change starts from accurate information. Existing project items and earlier comments remain part of the client relationship.
Step 4: Verify the handover
Confirm that the replacement can sign in using their own method. Check that the departing contact can no longer access the portal and that the finance contact still has the access they need. The verification checklist below covers the checks to make before the invitation and when confirming the handover.
Verification
Check sign-in and data access before inviting clients
Use a test client and sample items to check the access model before applying it to real contacts. For each access profile, check both the content somebody should see and the content they should not see:
Open the published portal in a private browser window and use the intended credentials or Google login. Test each sign-in method you plan to offer.
Check the data
Confirm the right projects, invoices and files appear, and that another client's records do not. For different access within one company, test each client item separately.
Check available actions
Confirm that editing, comments and approval buttons are available only where intended. Use sample items because those interactions can change real board data or run automations.
Check individual removal
With test logins, disable one login method. Confirm it cannot sign in again, and refresh an already signed-in session to check that further access is rejected. Confirm a colleague's enabled login still works.
Check whole-client removal
On the test client item, disable the client and confirm all its login methods are blocked. Re-enable it only if access is intended to continue. If your setup uses several client items for one company, check each one.
Preview is useful for checking content, but it does not prove that a person's login works. It bypasses normal sign-in and can open a client even when that client is disabled. Use the published portal and a real test login to verify authentication and access removal.
Automation
Automate the access decisions your team has already made
Once you know what the client items represent and when access should start or end, connect those decisions to the process you already manage in monday.com. For example:
Client becomes ready for onboarding → create login method → enable client → send invitation
Or at the end of the relationship:
Client status changes to Contract ended → disable the relevant client items → retain the work and client records
Treat a single person's departure separately from whole-client offboarding. An automation that disables the company client would also block the colleagues whose logins belong to it. For available blocks and a full lifecycle example, see how to automate client portal workflows in monday.com.
Common mistakes
Keep login, visibility and access decisions separate
- A new login is not a new permission level. Logins on the same client item share its access. Use separate client items and configure their content when people need different views.
- Hiding a page is not disabling a client. It changes the content offered by the portal, not whether that person's login is enabled. Manage access through the login method or client controls.
- A portal login is not a monday.com guest invitation. It provides access through your configured portal rather than adding the person to your monday.com workspace.
- Disabling access is not deleting the underlying data. Keep projects and history in monday.com while managing who can sign in to the portal.
Summary
Manage access around the client relationship
The useful access decision comes before the password: which people should share a view, and which need a different one? Client items define those access relationships, login methods let people sign in, and your team manages how access changes when people join, move roles or leave.
Start with a clear model, create the appropriate login methods and verify the result with real sign-ins. Then connect the routine parts to your monday.com workflow. The portal follows the relationship your team already manages, instead of becoming another contact list and access process to maintain separately.
Plan your client access
With Client Portal Builder for monday.com, you can manage client access alongside your existing boards and workflows. Use the client login guide for setup, and keep access decisions connected to the way your team manages each relationship.
Interested in a product demo?
Let's learn about your requirements, answer questions, and
review ways how we can help you and your organization with
our monday.com apps and solutions.
